

#LCAKMGB24 Cylon Centurion from Battlestar Galactica
- Gary
-
 Topic Author
- Offline
- Moderator
-

- Posts: 56
- Thanks: 20
#LCAKMGB24 Cylon Centurion from Battlestar Galactica
2 months 3 weeks ago - 2 months 3 weeks ago
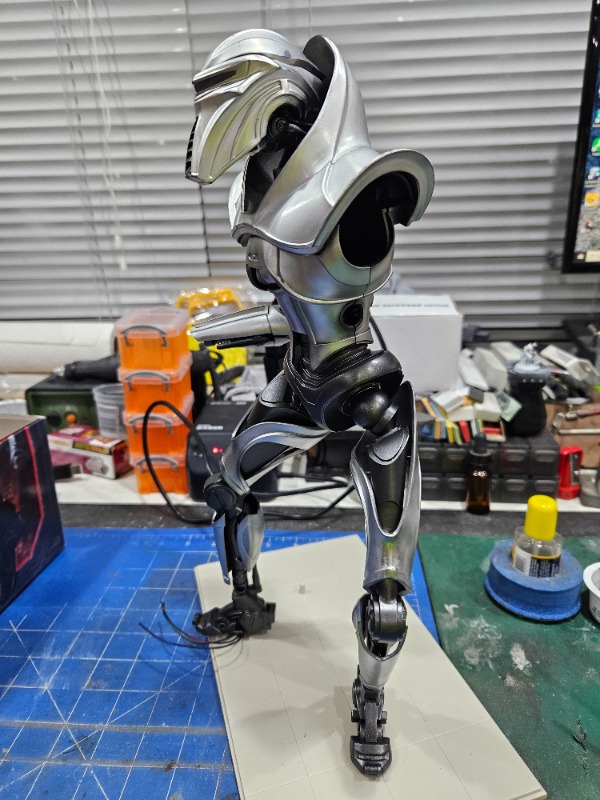
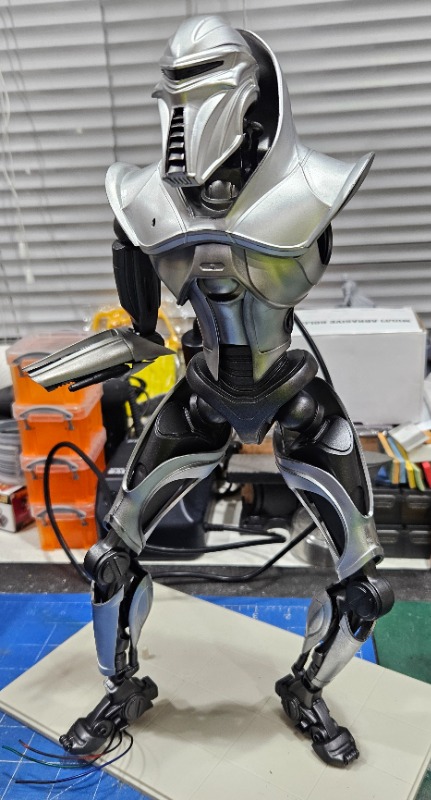
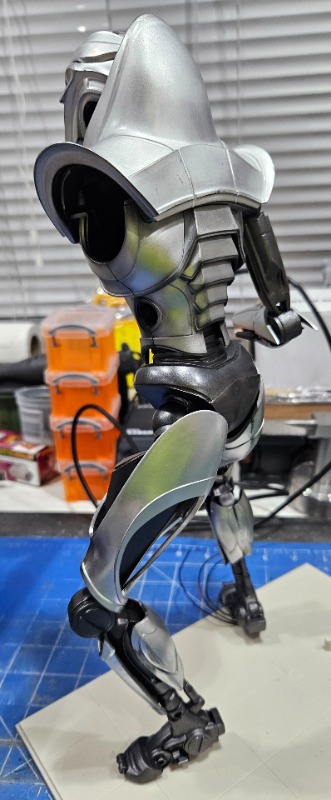
My first entry into the KM Group Build 2024. Cylon Centurion from the Battlestar Galactica reboot.
Going to make it very shiny and add some fancy schmancy lighting effects for the eyes (fingers crossed).
Started the project by wiring up the strobing eye effects on a breadboard to test the effect, I used regular 3mm LEDs instead of SMD LEDs as the light balance is better for the effect I need.
Once I was happy with this effect I transferred it to the interior of the head using plastic-card, I drilled out the holes for the LEDs and glued them in using CA.
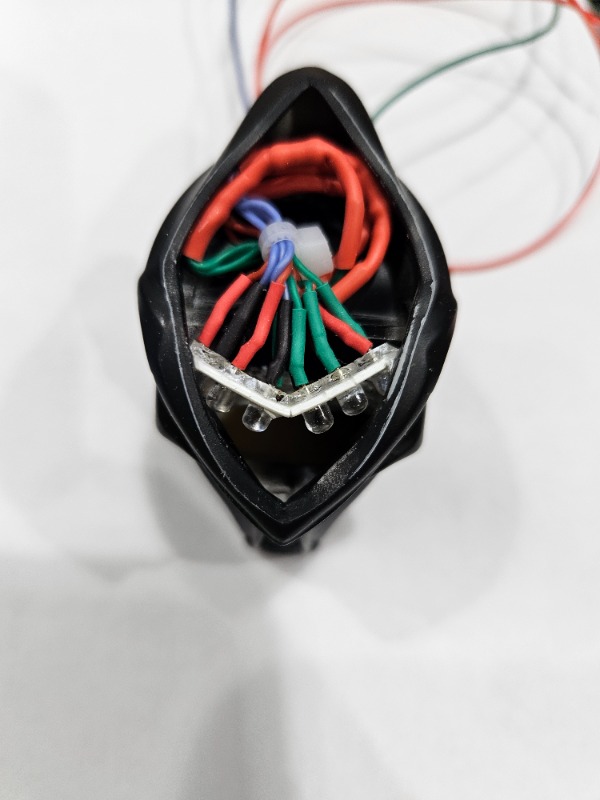
Tested that everything was still working prior to painting.
First round of paint applied and more testing of the circuits.
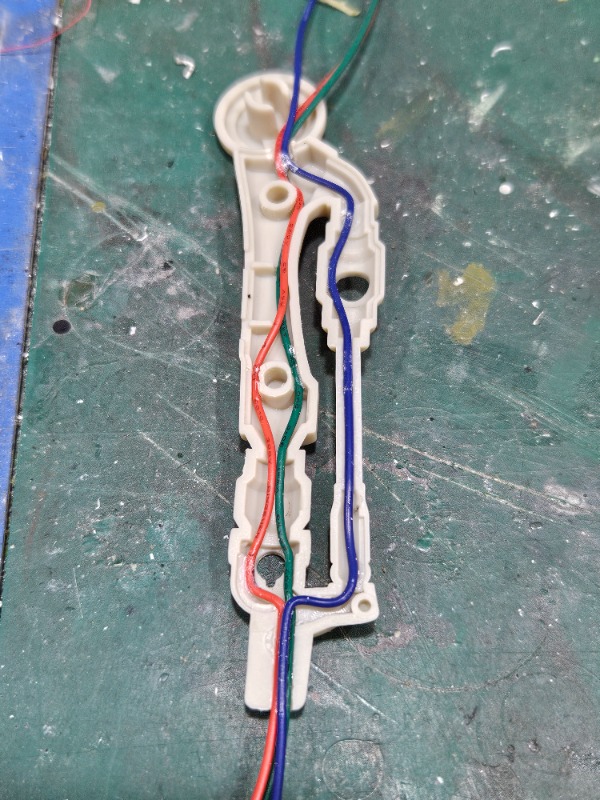
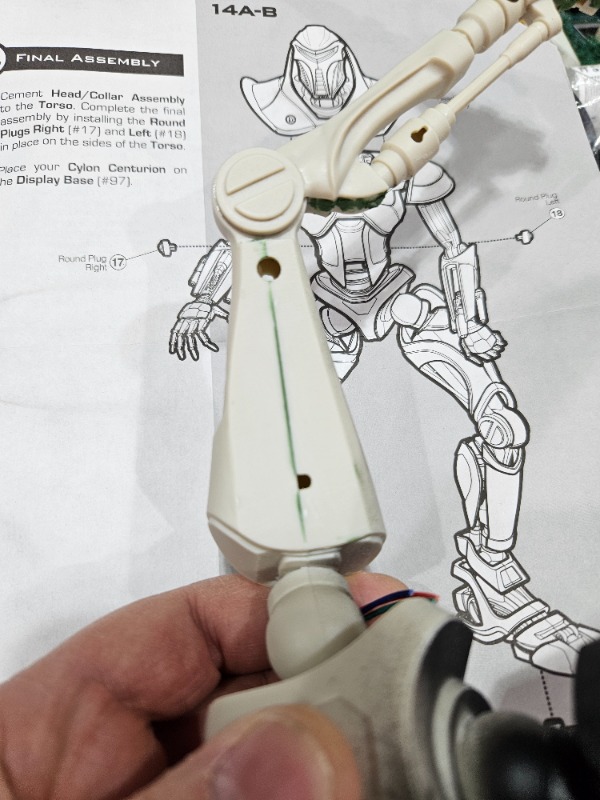
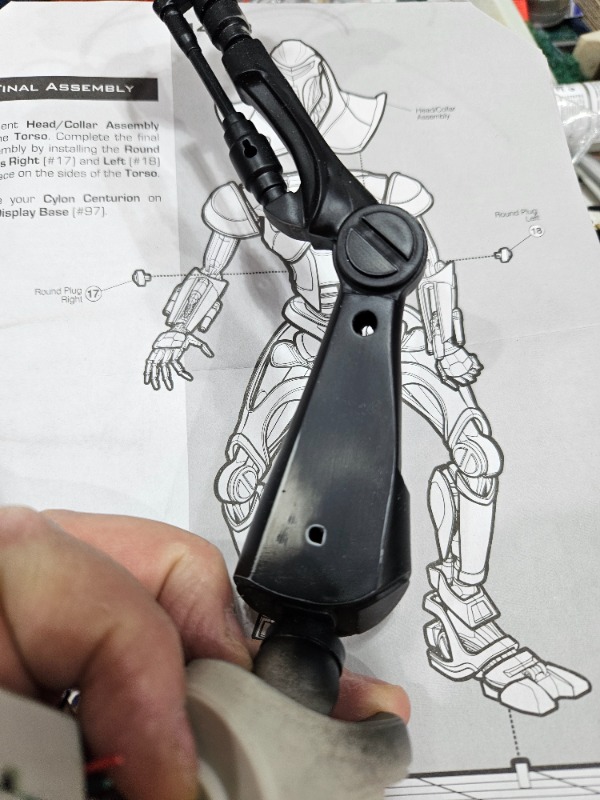
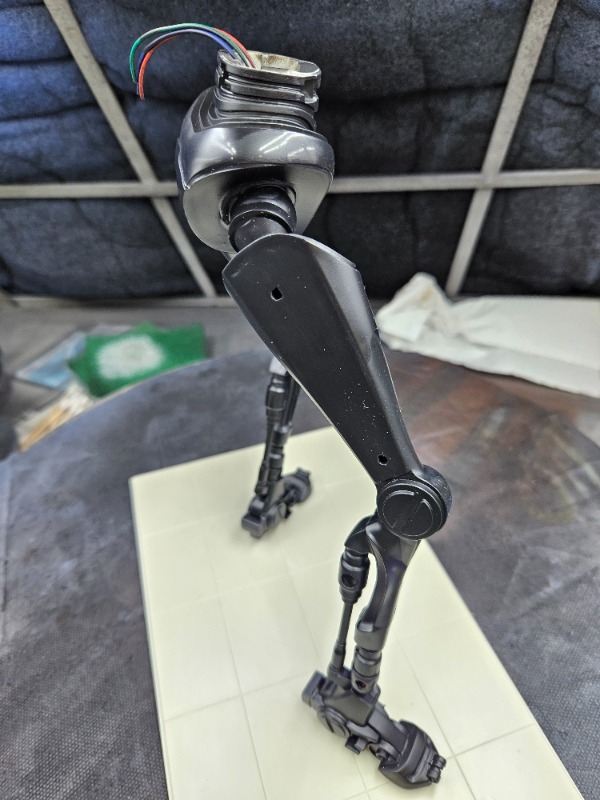
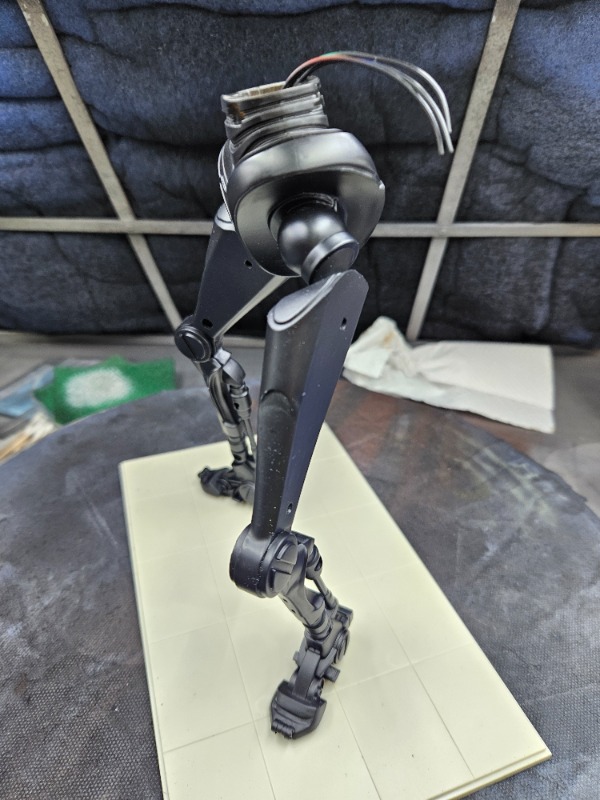
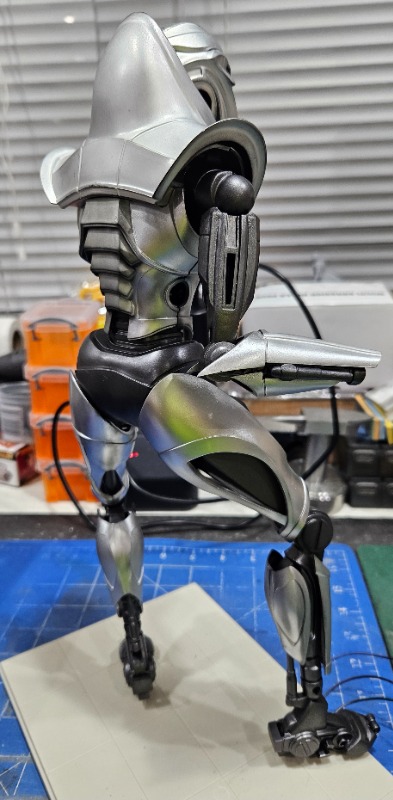
Started work on the legs next, which is a contradiction to the instructions, but I needed to see how I could thread the wiring up from the base.
First step was to cut away part of the legs and thread the wires through, securing them with CA prior to joining the legs up.
Legs glued up, filling and sanding away.
First layer of primer down to check the joints etc, fairly happy with this as you won't see much of this anyway as it's covered with addon armour.
Both legs done, fairly happy so far, no crazy joints to fill, onwards and upwards.
Last edit: 2 months 3 weeks ago by Gary.
Please Log in or Create an account to join the conversation.
- AlisterC
-

- Offline
- Admin
-

- Posts: 41
- Thanks: 15
Re: #LCAKMGB24 Cylon Centurion from Battlestar Galactica
2 months 3 weeks ago
That's such a cool topic to build. It's going to be so much more interesting with the red eyes as well. Very nice work.
The following user(s) said Thank You: Gary
Please Log in or Create an account to join the conversation.
- Whiterook
-

- Offline
- Admin
-
- Posts: 250
- Thanks: 10
Re: #LCAKMGB24 Cylon Centurion from Battlestar Galactica
2 months 2 weeks ago
I am soooooo glad to see this thread! I have this same model and it’s going to be great to see someone’s approach to building and painting it. This is definitely one of the coolest scifi kits I’ve come across, and being a huge Battlestar Galactica fan, especially the reimagined series, I had to have it, too! Watching closely.
Please Log in or Create an account to join the conversation.
- Fritz
-

- Offline
- User
-

- Posts: 29
- Thanks: 10
Re: #LCAKMGB24 Cylon Centurion from Battlestar Galactica
2 months 2 weeks ago
Awesome work so far Gary. The LED lighting is excellent
www.flickr.com/photos/65989117@N03/
Instagram:
modelsmikes
Instagram:
modelsmikes
The following user(s) said Thank You: Gary
Please Log in or Create an account to join the conversation.
- Gary
-
Topic Author
- Offline
- Moderator
-
- Posts: 56
- Thanks: 20
Re: #LCAKMGB24 Cylon Centurion from Battlestar Galactica
2 months 3 days ago - 2 months 3 days ago
Very brief update, still chugging along doing shiny bits and then having to rub it all back to remove the seams and filler etc. It's not been a hard build as such but because I'm lighting the head I have had to find ways to insert wires which has meant I have had to build it in reverse.
Still a way to go but it's getting there.
Still a way to go but it's getting there.
Last edit: 2 months 3 days ago by Gary.
Please Log in or Create an account to join the conversation.
- Kiwi_Bloke
-

- Offline
- User
-
- Posts: 11
- Thanks: 1
Re: #LCAKMGB24 Cylon Centurion from Battlestar Galactica
2 months 2 days ago
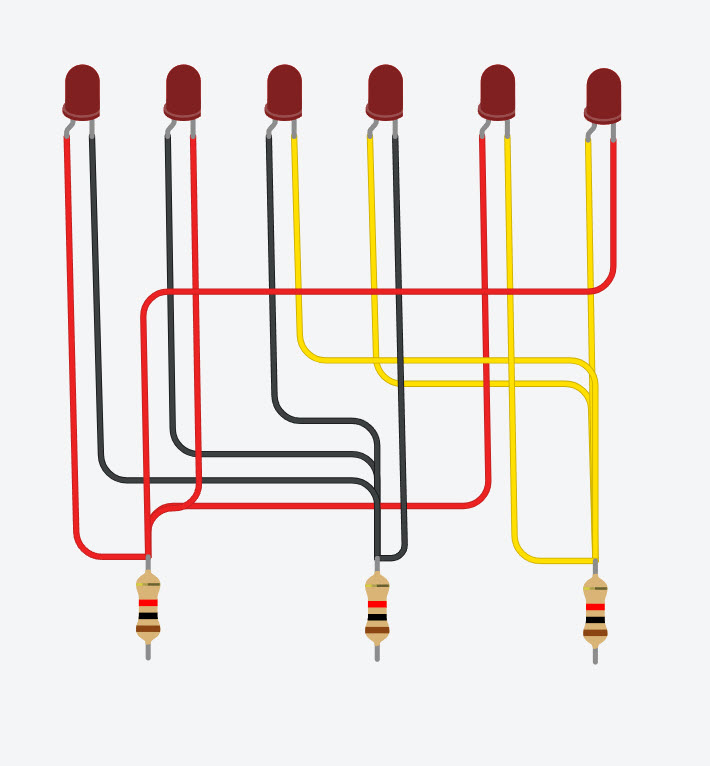
I am watching this with interest and I have a question around the LED's, given that it appears there are only 3 wires going to the head and there are 6 LEDS, how does the chasing work?
Could you share the wiring schematic please?
Thanks
Could you share the wiring schematic please?
Thanks
The following user(s) said Thank You: Gary
Please Log in or Create an account to join the conversation.
- AlisterC
-
- Offline
- Admin
-
- Posts: 41
- Thanks: 15
Re: #LCAKMGB24 Cylon Centurion from Battlestar Galactica
2 months 13 hours ago
Just gotta say how cool that's looking, and will be over the top when the lights bring it to life. Nice work!
The following user(s) said Thank You: Gary
Please Log in or Create an account to join the conversation.
- Gary
-
Topic Author
- Offline
- Moderator
-
- Posts: 56
- Thanks: 20
Re: #LCAKMGB24 Cylon Centurion from Battlestar Galactica
2 months 10 hours ago
Hey mate, hope this makes sense, I sketched it up for you, the left leg is the Anode (+) the resistors connect to Pins 11, 12 & 13 on an Arduino.
Please Log in or Create an account to join the conversation.
- Kiwi_Bloke
-
- Offline
- User
-
- Posts: 11
- Thanks: 1
Re: #LCAKMGB24 Cylon Centurion from Battlestar Galactica
1 month 4 weeks ago
I understand the principle behind this but haven't tried it, I do have a multiplex led kit that I am slowly assembling which works the same way,
would you share the code with me please?
would you share the code with me please?
Please Log in or Create an account to join the conversation.
- Gary
-
Topic Author
- Offline
- Moderator
-
- Posts: 56
- Thanks: 20
Re: #LCAKMGB24 Cylon Centurion from Battlestar Galactica
1 month 1 week agoCode:
const int LED_1 = 12; //LED row 1
const int LED_2 = 11; //LED row 2
const int LED_3 = 10; //LED row 3
void setup()
{
}
void loop()
{
//turn on LED L1
pinMode(LED_1, OUTPUT); //row 1
digitalWrite(LED_1, HIGH);
pinMode(LED_2, OUTPUT); //row 2
digitalWrite(LED_2, LOW);
pinMode(LED_3, INPUT); //row 3
digitalWrite(LED_3, LOW);
delay(200);
//turn on LED L2
pinMode(LED_1, OUTPUT); //row 1
digitalWrite(LED_1, LOW);
pinMode(LED_2, OUTPUT); //row 2
digitalWrite(LED_2, HIGH);
pinMode(LED_3, INPUT); //row 3
digitalWrite(LED_3, LOW);
delay(200);
//turn on LED L3
pinMode(LED_1, INPUT); //row 1
digitalWrite(LED_1, LOW);
pinMode(LED_2, OUTPUT); //row 2
digitalWrite(LED_2, HIGH);
pinMode(LED_3, OUTPUT); //row 3
digitalWrite(LED_3, LOW);
delay(200);
//turn on LED L4
pinMode(LED_1, INPUT); //row 1
digitalWrite(LED_1, LOW);
pinMode(LED_2, OUTPUT); //row 2
digitalWrite(LED_2, LOW);
pinMode(LED_3, OUTPUT); //row 3
digitalWrite(LED_3, HIGH);
delay(200);
//turn on LED L5
pinMode(LED_1, OUTPUT);
digitalWrite(LED_1, HIGH);
pinMode(LED_2, INPUT);
digitalWrite(LED_2, LOW);
pinMode(LED_3, OUTPUT);
digitalWrite(LED_3, HIGH);
digitalWrite(LED_3, LOW);
delay(200);
//turn on LED L6
pinMode(LED_1, OUTPUT); //row 1
digitalWrite(LED_1, LOW);
pinMode(LED_2, INPUT); //row 2
digitalWrite(LED_2, LOW);
pinMode(LED_3, OUTPUT); //row3
digitalWrite(LED_3, HIGH);
//delay(200);
//Turn LED L1 Off
//pinMode(LED_1, OUTPUT); //row 1
//digitalWrite(LED_1, LOW);
//pinMode(LED_2, OUTPUT); //row 2
//digitalWrite(LED_2, LOW);
//pinMode(LED_3, INPUT); //row 3
//digitalWrite(LED_3, LOW);
delay(200);
//turn on LED L6
pinMode(LED_1, OUTPUT); //row 1
digitalWrite(LED_1, LOW);
pinMode(LED_2, INPUT); //row 2
digitalWrite(LED_2, LOW);
pinMode(LED_3, OUTPUT); //row3
digitalWrite(LED_3, HIGH);
delay(200);
//turn on LED L5
pinMode(LED_1, OUTPUT);
digitalWrite(LED_1, HIGH);
pinMode(LED_2, INPUT);
digitalWrite(LED_2, LOW);
pinMode(LED_3, OUTPUT);
digitalWrite(LED_3, HIGH);
digitalWrite(LED_3, LOW);
delay(200);
//turn on LED L4
pinMode(LED_1, INPUT); //row 1
digitalWrite(LED_1, LOW);
pinMode(LED_2, OUTPUT); //row 2
digitalWrite(LED_2, LOW);
pinMode(LED_3, OUTPUT); //row 3
digitalWrite(LED_3, HIGH);
delay(200);
//turn on LED L3
pinMode(LED_1, INPUT); //row 1
digitalWrite(LED_1, LOW);
pinMode(LED_2, OUTPUT); //row 2
digitalWrite(LED_2, HIGH);
pinMode(LED_3, OUTPUT); //row 3
digitalWrite(LED_3, LOW);
delay(200);
//turn on LED L2
pinMode(LED_1, OUTPUT); //row 1
digitalWrite(LED_1, LOW);
pinMode(LED_2, OUTPUT); //row 2
digitalWrite(LED_2, HIGH);
pinMode(LED_3, INPUT); //row 3
digitalWrite(LED_3, LOW);
delay(200);
//turn on LED L1
pinMode(LED_1, OUTPUT); //row 1
digitalWrite(LED_1, HIGH);
pinMode(LED_2, OUTPUT); //row 2
digitalWrite(LED_2, LOW);
pinMode(LED_3, INPUT); //row 3
digitalWrite(LED_3, LOW);
delay(300);
}
Please Log in or Create an account to join the conversation.
Time to create page: 0.191 seconds